
I built an Apple TV app for a practical reason: I wanted to manage my home media setup from the couch. What it became was so much more.
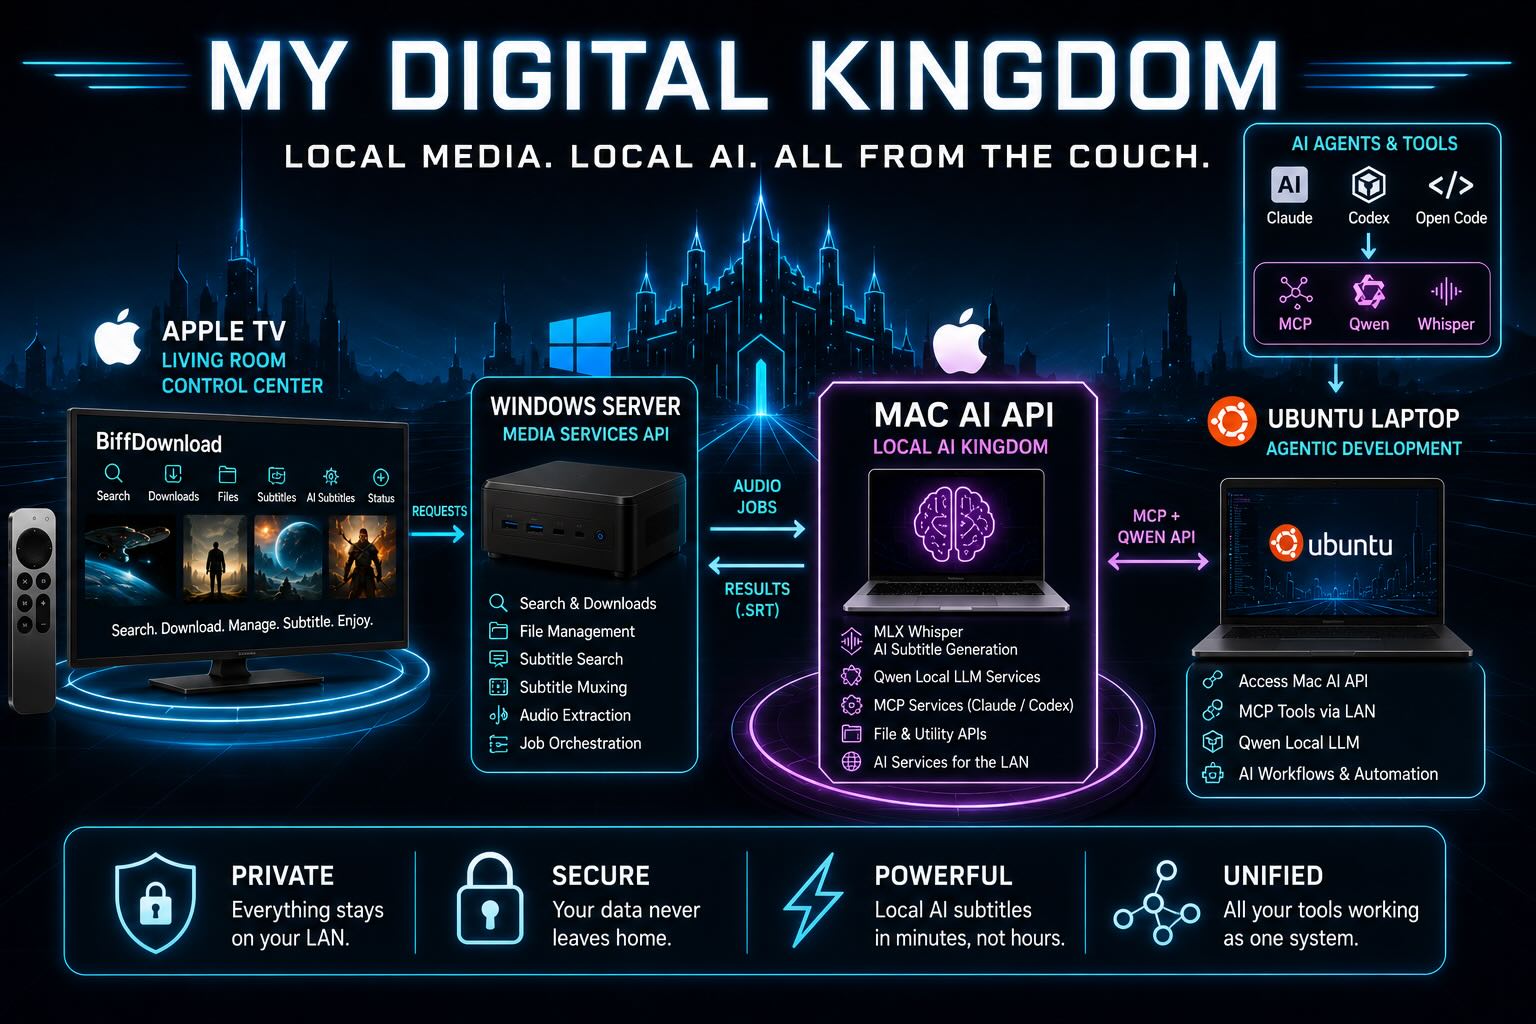
My “Digital Kingdom” is a collection of machines that each do one job well: the Apple TV is the control center, the Windows server manages media, and the Mac has become a shared AI appliance providing local Qwen, Whisper, and MCP services across my network.
At home I have three Apple TVs, a small always-on Windows mini PC that acts as a media server, and a Mac that handles local AI jobs. The more I used that setup, the more annoying it became to walk back to a computer just to search for something, move files around, attach subtitles, or check whether the server was running out of space.
BiffDownload started as a simple Apple TV front end for that media server. It has evolved into the keys to the “kingdom”: a Swift tvOS app, a Python API on Windows, a Python AI helper API on macOS, and a Linux machine that uses the Mac’s MCP and local AI services.
This is a follow-up to my earlier post, Local AI is Saving Me $, where I wrote about using local AI to process my personal photo and video archive. That post was mostly about cost and long-running AI jobs. This one is about the product layer around my home media setup: the Apple TV interface, the local APIs behind it, and the subtitle workflows that now run across machines on my LAN.
The Basic Idea
BiffDownload is not a replacement video player. I still use VLC on Apple TV for playback over DLNA/UPnP. BiffDownload is the control panel to manage the media.
From the Apple TV remote I can:
- Search for media
- Queue downloads to a chosen folder
- Watch transfer progress
- Browse and manage files on the server
- Search for existing subtitles
- Attach subtitles to videos
- Generate new AI subtitles locally
- Check server status and disk usage
The important part is that all of this happens from the TV. No remote desktop session. No laptop on the couch. No walking over to the media server for routine tasks.
Apple TV Demo
For the demo video, I used TPB AFK: The Pirate Bay Away From Keyboard (2013), a Creative Commons licensed documentary released by filmmaker Simon Klose. I chose it because it is legal to download and is widely available, making it good for demonstrating a download operation visually.
TPB AFK: The Pirate Bay Away From Keyboard (2013) Copyright Simon Klose | tpbafk.tv Licensed under CC BY-NC-ND 3.0
https://creativecommons.org/licenses/by-nc-nd/3.0
The Three Main Pieces
The system currently has three main services.
Apple TV App
The front end is a native tvOS app written in Swift. It is designed for the Apple TV remote, so the UI has to be clear from across the room and work well with focus navigation instead of a mouse or touch screen.
The app talks to the Windows API over the local network. It does not know how to run ffmpeg, talk to aria2, search OpenSubtitles, or mux subtitle tracks directly – those all happen on the Windows media server where the media library lives. It sends requests, polls job status, and presents the current stage to the user.
That separation made the app much easier to evolve. The Apple TV app can stay focused on workflow and feedback while the server handles the messy media operations.
Windows Media Server API
The Windows mini PC is the always-on machine. It runs the main Python API and owns the media library.
That API handles:
- Search integration
- Download queueing
- File and folder operations
- Transfer status
- Disk information
- Subtitle search through OpenSubtitles
- Subtitle muxing
- Audio extraction for AI transcription
- Calling the Mac AI helper service
The API wraps these Windows command-line tools into simpler endpoints that the Apple TV app can use.
| Project | Homepage / Download | Purpose |
|---|---|---|
| aria2 | https://aria2.org/ | High-performance command-line download manager supporting HTTP(S), FTP, SFTP, BitTorrent, and Metalink. |
| Prowlarr | https://prowlarr.com/ | Indexer manager for Sonarr, Radarr, Lidarr, Readarr, and other *Arr applications. |
| Jackett | https://github.com/Jackett/Jackett | Translates searches from hundreds of torrent trackers into a standard Torznab API. |
| Subliminal | https://subliminal.readthedocs.io/ | Python library and CLI for automatically finding and downloading subtitles from multiple providers. |
| FFmpeg | https://ffmpeg.org/ | Industry-standard multimedia toolkit for converting, transcoding, streaming, filtering, recording, and processing audio/video. Supports virtually every major media format. |
| MKVToolNix | https://mkvtoolnix.download/ | Suite of tools for creating, inspecting, splitting, merging, editing, and modifying Matroska (MKV) files without re-encoding. Includes the popular mkvmerge and MKVToolNix GUI. |
This is also where most of the orchestration happens. For example, when the Apple TV app asks for AI subtitles, the Windows API extracts the audio, sends it to the Mac API, receives the .srt, validates it, and then creates a new video copy with the subtitle track embedded.
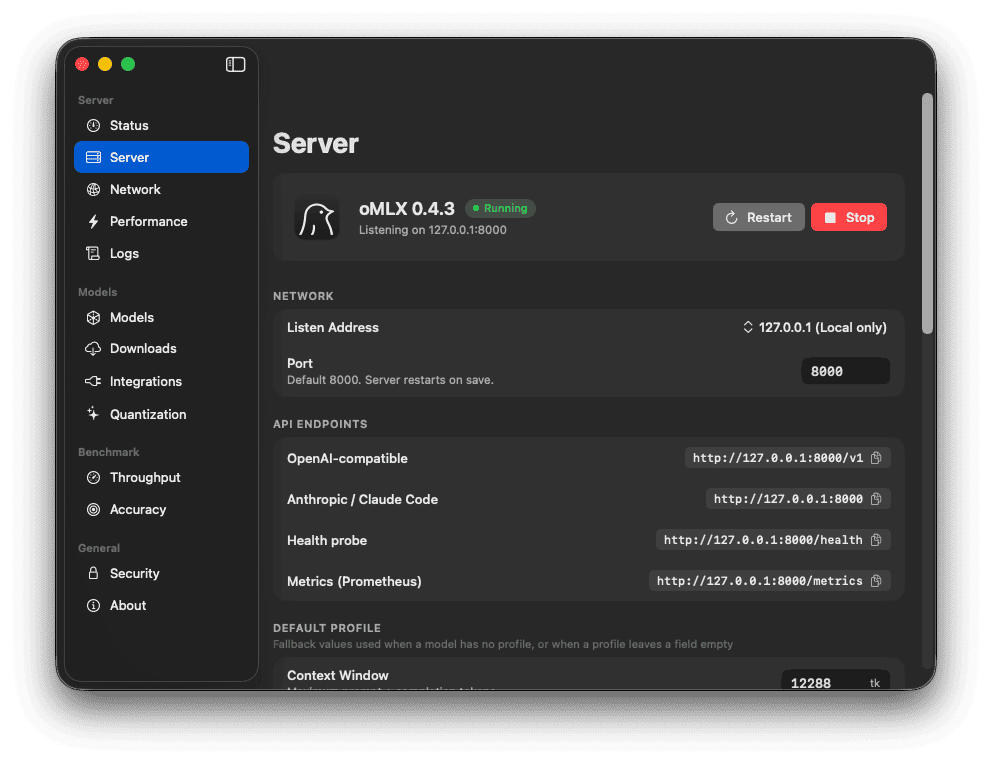
Mac AI Helper API
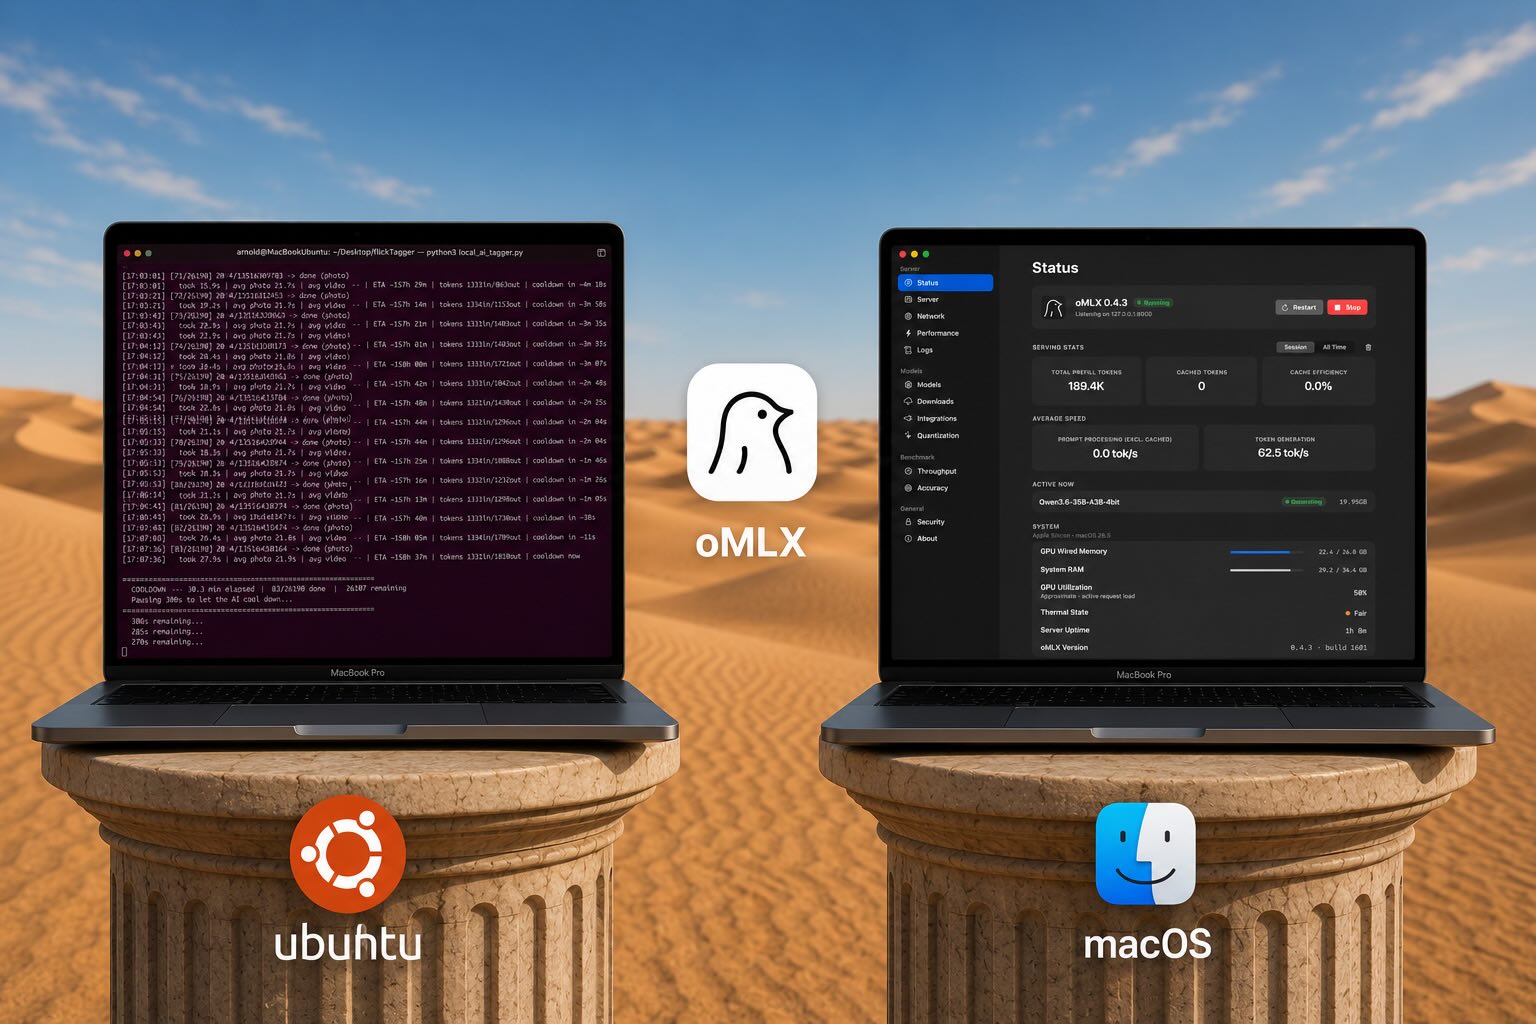
The Mac runs a separate Python helper API for local AI work. For subtitles, it runs MLX Whisper on Apple Silicon. It also exposes local AI services backed by Qwen models, plus MCP services that Claude and Codex can use from other machines on my network.
The reason for splitting this out is simple: the Windows mini PC is great as an always-on file and download server, but the Mac is much better for local AI inference. Rather than force one machine to do everything, the Windows service sends the audio over the LAN and lets the Mac do the transcription work.
For a full-length movie, the Mac can usually generate subtitles in about 5 minutes—longer if the audio is in a non-English language and it triggers translation. That is fast enough for the way I use it, especially since the whole job can be started from the Apple TV and left alone.
The same Mac service layer is also useful outside the Apple TV workflow. Claude and Codex sessions running on other machines can reach back to the Mac for local model access, transcription tools, and MCP-backed utilities. That makes the Mac more like a shared AI appliance on the LAN than a single-purpose subtitle box. For example, my Linux machine can use MCP to keep repository documentation—such as README files—in sync with Obsidian notes stored in a vault on the Mac.
Two Subtitle Paths
Subtitles are one of the biggest reasons this project became useful. I have two different subtitle workflows now: a normal online subtitle search path and a local AI generation path.
OpenSubtitles Search
The first path uses the existing subtitle ecosystem. From the Apple TV app, I can select a video and search for matching subtitle files through the Windows API. The server uses subliminal to query OpenSubtitles, download a matching .srt, and then mux that subtitle into a new video copy.
That workflow is usually the best option when a good subtitle already exists. It is faster than AI transcription, and it avoids generating text that someone has already created and synced.
The Apple TV app treats this as a normal media-management task:
- Pick a video.
- Search for subtitles.
- Choose a result.
- Ask the server to attach it.
- Play the new copy in VLC.
This is the boring path—and that’s exactly why it matters. If OpenSubtitles has a good match, I do not need AI at all.
Local AI Subtitle Generation
The second path is for videos where I cannot find a good subtitle. That is where the Mac helper service comes in.
From the Apple TV, the AI workflow looks simple:
- Choose a video.
- Start AI subtitle generation.
- Watch the stages update.
- Review the result.
- Use the new subtitled copy.
Behind the scenes, the Windows API does a lot more:
- Probe the video with ffprobe.
- Extract a compact audio file with ffmpeg.
- Send the audio and source duration to the Mac API.
- Run MLX Whisper on the Mac.
- Receive the generated SRT file.
- Validate the subtitles.
- Mux the subtitle track into a new MKV copy.
The Apple TV app now shows the major stages in that pipeline:
- Extracting audio
- Uploading audio
- Generating subtitles
- Receiving subtitle file
- Checking quality
- Merging video
The result is that subtitle search and subtitle generation live side by side. The normal subtitle service is the first choice when it works. Local AI is the fallback when no good match exists.
Why the API Spec Became Important
One thing that made this project manageable was keeping API spec documents up to date.
The Windows API has a Markdown spec that describes the endpoints, request bodies, responses, job states, and examples. The Mac API has its own spec too, covering the local AI services, Whisper transcription endpoints, subtitle generation behavior, and the helper features used by other machines.
Those specs became the contracts between the Apple TV app, the Windows media server, and the Mac AI service. As I added features, I updated the specs and used them to keep the Swift app and both Python APIs aligned.
That mattered a lot because I was using AI coding tools across different parts of the system. Claude and Codex were used on macOS, Windows, and Linux to build it all. The Mac API also provides local Qwen-based AI services and MCP tools that Claude and Codex can use while running on other machines, so the documentation has to describe not just app endpoints, but also the shared AI services available on the network.
A Cool Agentic Coding Moment
One of the moments that really changed how I think about AI-assisted development happened while building this project.
From a single terminal window, Claude or Codex wasn’t just editing one codebase. It was coordinating work across my entire local development environment.
A single request could:
- Modify the Python media server running on the Windows mini PC.
- Update the Python AI helper API running on the MacBook Pro.
- Add new Swift models, networking code, and UI to the Apple TV app.
- Update the shared Markdown API specifications.
- Build and test each component before moving on to the next.
From my perspective, I was still working in a single terminal window. Behind the scenes, the AI was making coordinated changes across three independent codebases running on different computers, communicating through well-defined APIs.
Tools In The Stack
The system uses a mix of regular media tools and local AI tools.
Apple TV
- Swift
- tvOS
- Xcode
Windows Media Server
- Python
- aria2
- Prowlarr
- Jackett
- subliminal
- OpenSubtitles
- ffmpeg
- ffprobe
- MKVToolNix / mkvmerge
- PowerShell for service management
Mac AI Service
- Python
- MLX Whisper
- Local Qwen AI services
- MCP services for Claude and Codex
- Apple Silicon
- Local network API calls
Development
- Claude
- Codex
- Markdown API specs
- Generated HTML API test pages