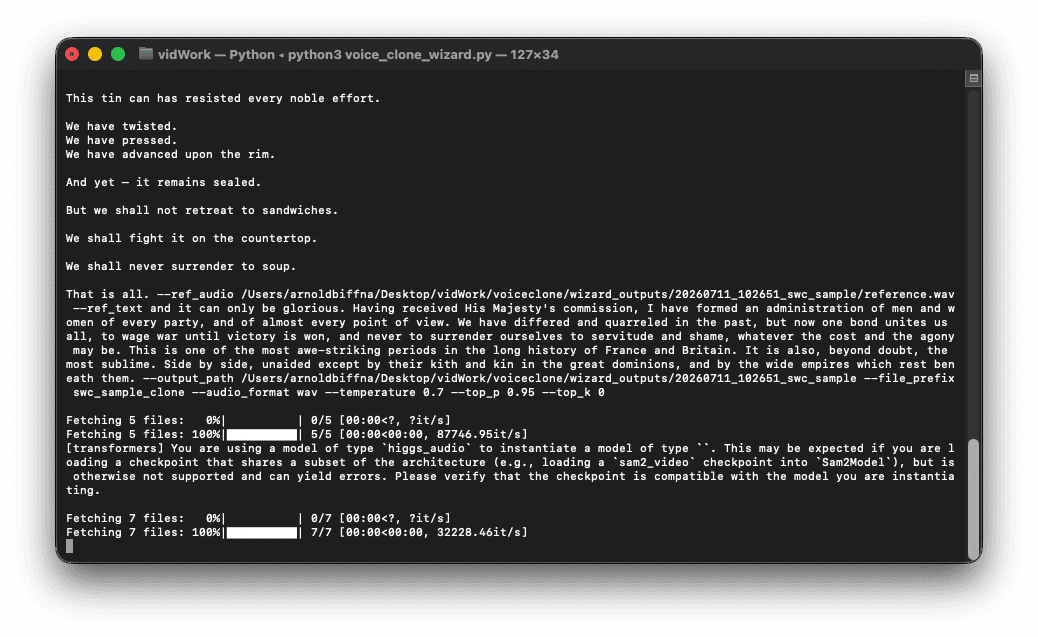
I am completely amazed at how well voice cloning works locally on my machine.
Components
I already had a local MLX Whisper model running, which I use to generate subtitles from video. I thought that was all I needed. Then I asked Codex to build me a voice cloning tool in Python, and it went much deeper than I expected.
The tool ended up using:
Python
FFmpeg and FFprobe
MLX Audio text-to-speech
MLX Whisper transcription
Hugging Face model snapshots
Warning
Voice cloning needs to be handled responsibly. Permission, disclosure, and context matter. For this experiment, I used a historical public figure rather than cloning the voice of a living person.
What the Tool Does
Lets me choose a reference audio or video file
Lets me choose a speech text file
Detects and skips leading silence (FFmpeg)
Extracts and cleans a reference voice sample (FFmpeg)
Transcribes the cleaned reference using an MLX Whisper model (whisper-large-v3-mlx)
Generates new speech from text using a local MLX Audio model (higgs-audio-v2-3B-mlx-q8)
The wild part is that all of this runs locally. No cloud service. No subscription API. Just my Mac, some open-source tools, and a Python script that suddenly feels a little too powerful.
I have been experimenting with local AI for a practical reason: I wanted to make my personal photo and video archive searchable without paying cloud AI prices indefinitely. Cloud AI is faster and easier, but costs money each time and sends files to outside servers. Local AI runs on your own computer, so it is slower but more private and cheaper for repeated processing.
My collection is large enough to make this interesting: roughly 30,000 photos and videos gathered over many years. I originally stored them on Flickr, but the cost and export limitations became frustrating. One issue that stood out was Flickr’s migration tooling, including limits such as being unable to export albums with more than 500 photos at a time.
AI coding tools changed the equation for me. With Claude and Codex, I was able to migrate the media to AWS S3 and create apps to browse the collection on the web and on Apple TV.
The Problem
Moving the files was only part of the project. The bigger goal was search.
I did not want to search only by filename, date, or folder. I wanted to search by what was actually in the media:
“beach sunset”
“birthday party”
“dog in the backyard”
“old vacation video”
“kids opening presents”
“mountains with snow”
That requires descriptions, tags, and metadata for each item. For photos, this is fairly straightforward. For videos, it is more complicated because the AI needs representative frames or some kind of visual summary.
The Pricier Fix
A few months ago, I started a project to generate tags and short descriptions for the entire collection and store the results in MySQL.
My first version used cloud AI. I wrote Python scripts that sent images to the OpenAI API, received tags and descriptions, and saved the results back into the database.
Using an older model, GPT-5.2, I was able to generate about 30,000 sets of tags and short descriptions for the images. That worked, but it cost around $80 in API calls, and that was only for photos, not videos.
That cost was not outrageous for a one-time project, but it made me think differently. If I wanted to reprocess the archive, get more detailed descriptions, include videos, or run future batches, the cost would keep adding up.
Enter Local AI
While working on this, I started experimenting with local AI. On my machine, I don’t expect it to replace ChatGPT, Claude, or Codex, but I’m hoping to match that older GPT-5.2 model I paid for.
My local setup is simple:
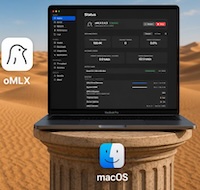
Main AI machine
Apple M2 Max MacBook Pro, 2023
32 GB RAM
1 TB SSD
macOS
Long-running worker machine
Apple MacBook Pro, 2016 Intel i7
16 GB RAM
500 GB SSD
Ubuntu
The newer Mac runs the AI in macOS. The older Mac runs the long Python jobs in Ubuntu, so my main computer is not tied up all day and I can still use it for light processing tasks. The Ubuntu machine sends requests over the local network to the AI server running on macOS.
At first, I tried the usual local AI tools for Mac:
Ollama
LM Studio
AnythingLLM
I downloaded large Apple Silicon-optimized models, often in the 8 GB to 30 GB range, and tested them with chat, coding, and image-description experiments. On my hardware, the experience was not great. The models were slow, and the results were not impressive enough to justify the hassle.
Then I found this video and it changed everything!
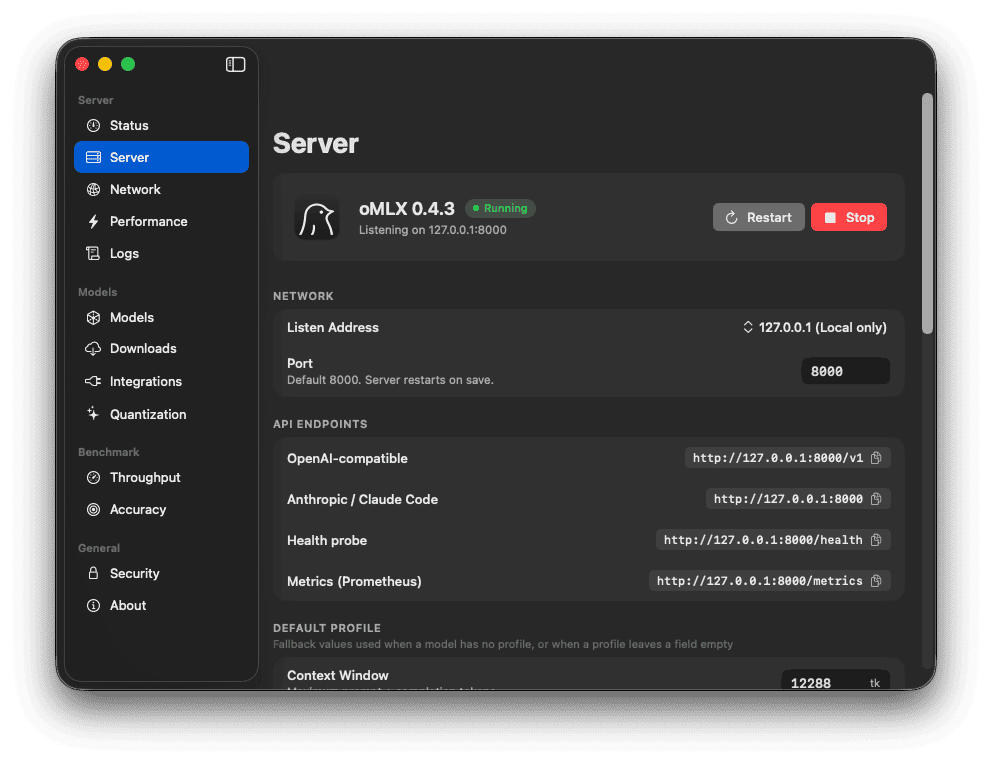
That led me to try oMLX. It intelligently manages memory, which is the biggest bottleneck of running local AI.
Why oMLX Worked Better for Me
Some of the same models I had already tried felt much faster and more usable when loaded through oMLX compared with Ollama, LM Studio, and AnythingLLM.
What seems to make the difference is not just raw model speed, but how the stack uses Apple Silicon. MLX is built around the Mac’s unified memory architecture, and oMLX appears to make better use of that while also treating older context more like cacheable state than something that must stay fully resident in RAM at all times. For my workload, that matters more than benchmark bragging rights. I am sending resized images and a handful of video frames in long unattended batches, so a systemthat manages memory well and stays responsive under pressure is more useful than one that only feels fast in short interactive chats.
I am not running the latest Mac with 128 GB of memory – I am using a 32 GB M2 Max MacBook Pro from 2023, so memory pressure matters.
The tipping-point model for me was this model, on my machine, in oMLX:
Qwen3.6-35B-A3B-4bit
This model had barely been functional on my machine using Ollama/LM Studio/AnythingLLM. With oMLX, it became very usable – enough for long-running image and video description jobs.
It’s nowhere near today’s cloud models, but still useful enough for some tasks that don’t require higher thinking. It reminds me of where cloud models were roughly a year ago- around the time OpenAI was transitioning from GPT4 to GPT5.
The Cheaper Fix
The oMLX app makes it easy to startup the server, download models, and tweak the performance. Once I had the local AI server running, I started building Python scripts to query it.
The goal was to generate richer, larger descriptions for both images and videos, then save those descriptions into a new database. For videos, the script uses FFmpeg to extract sample frames and sends those frames to the local model as visual context. A simpler operation will follow to migrate that data where I host the image information.
The workflow looks like this:
The Ubuntu machine runs a Python script.
The script reads media records from MySQL.
For images, it resizes the image to a practical size before sending it to the AI model.
For videos, it extracts five frames with FFmpeg.
It also extracts and stores exif data using ExifTool.
The script sends the image or video frames to the oMLX server running on the Mac.
The local model returns a content description and tags.
The script stores the result in MySQL.
If the script stops, it can resume later without starting over.
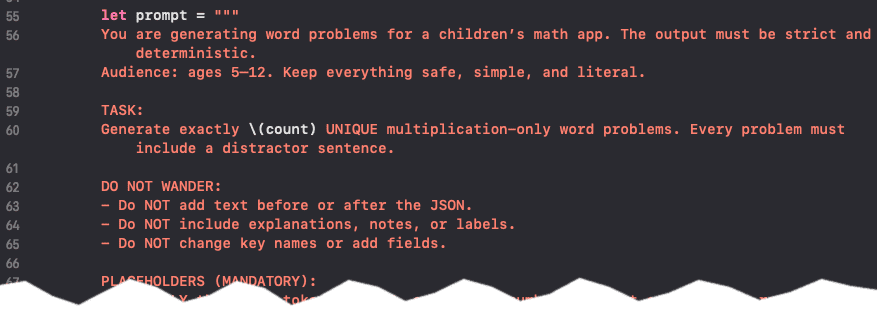
Here is the basic idea of the video prompt:
Local AI Test
Before I started building this out, I used OpenCode to test the local AI model’s ability with the prompt above. I captured the session in the clip below, which also reveals the video content that was analyzed.
Result
The frames show a young boy wearing a white suit dancing at an outdoor nighttime birthday party. A decorated banner reading “Happy 50th Birthday Minnie” with colorful illustrations is hung on a block wall behind him. Colored party lights—red and green—cast spots on the wall as the boy moves across the concrete patio, appearing to dance. Several other people, including adults and possibly other children, stand to the right watching, with one person in a plaid shirt partially visible. Large leafy plants or bushes are visible to the right of the wall.
The Plan
The full plan is to let the Ubuntu machine run for days if necessary while the M2 Max handles the local AI requests.
The script will:
Traverse the database of roughly 30,000 images and videos.
Resume safely if the process is stopped or interrupted.
Use ExifTools to collect camera and location metadata where available.
Use FFmpeg to extract five representative frames from each video.
Query the local oMLX AI server for image and video content descriptions.
Store the generated descriptions and metadata in a new MySQL table.
The important part is that I am no longer paying per image or per video, and can run more computationally expensive queries such as full 1-2 paragraph image descriptions. Once the local AI setup is working, the cost is mostly electricity, heat, and time.
Challenges
This was not plug-and-play. I had to do a fair amount of tuning.
One issue was image size. Some of the images being sent to the local AI model were too large, which created context window and memory problems. That may also explain why the earlier cloud API run became more expensive than expected.
I asked Codex to recommend a practical image size for tagging and description generation. The script now resizes images before sending them to the AI server. The resized images are still good enough for recognition, but they are much easier on the model.
I also used ChatGPT to analyze my oMLX server logs and help tune performance settings, including:
Context window
Maximum tokens
Concurrent requests
Heat was another issue. During long runs, the MacBook Pro can get hot from sustained CPU, GPU, and memory usage. To reduce stress on the machine, I added a five-minute cooldown after every 500 requests.
This makes the 6-day job take 4 hours longer, but that is acceptable. The whole point of this setup is that it can run unattended.
Current Results
It is working.
The current run is slow, but steady. With around 30,000 media items and an average of roughly 22 seconds per item, the full job should take 6 days or more with breaks.
That sounds terrible compared with cloud processing, but it changes the economics. I can stop, tweak prompts, retry batches, and improve the database without watching a meter run.
For my use case, local AI does not have to be instant. It just has to be good enough, reliable enough, and cheap enough to keep running.
What I Learned
Local AI (for my hardware) is more powerful than I expected, but is much slower than cloud-models and takes more setup. Even so, local AI has its own advantages:
No per-request cost
Ability to reprocess data without paying again
Useful performance on consumer Apple Silicon hardware
A good fit for long-running batch jobs
For a project like tagging and describing a lifetime of personal photos and videos, that tradeoff makes sense.
Another surprising part is that older hardware still has a role. My 2016 Intel MacBook Pro is not running the AI model, but it is perfect as a worker machine that can run Python scripts all day. The M2 Max does the AI work, and the Ubuntu laptop keeps the pipeline moving.
That combination turned out to be exactly what I needed: one machine for local AI, one machine for automation, and no cloud bill for every experiment.
Built with Swift, SpriteKit, and an AI-assisted workflow (Claude + Codex)
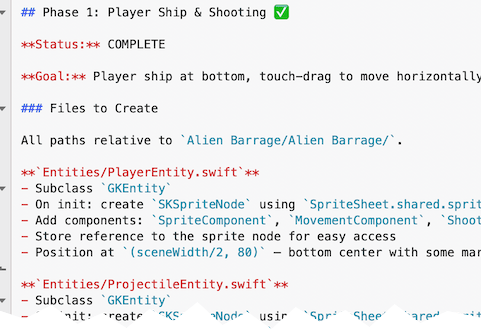
This week I released a new game on the App Store: Alien Barrage. The project took about three months to build and ultimately grew into a roughly 20,000-line Swift/SpriteKit game.
While AI tools played a major role in accelerating development, the project still required significant engineering work: planning systems, designing gameplay, testing, debugging, integrating platform services, managing the AI workflow, and continuously refining the experience based on iteration and feedback.
The game itself was inspired by the classic arcade shooters I grew up playing. I combined elements I enjoyed from several games, added my own mechanics and pacing ideas, and let the gameplay evolve naturally throughout development. In many ways, Alien Barrage became both a technical experiment and a throwback to the arcade era.
Why I Chose Native iOS Development
I considered building the game in Unity, but ultimately decided to use Apple’s SpriteKit framework and develop the project natively in Swift.
Part of that decision was practical: I wanted to build more directly against modern Apple-native frameworks and services, including:
Swift and Xcode workflows
SpriteKit
Game Center leaderboards and achievements
In-App Purchases
Native App Store deployment
Localization pipelines
The game and App Store content were ultimately translated into 14 languages.
Coming from years of cross-platform development using Xamarin, .NET MAUI, React Native, and Adobe AIR, I wanted to push further into modern native Apple development and build more directly against platform-native frameworks and tooling.
Development with AI
The project was developed using a custom AI-assisted workflow built primarily around Claude and Codex.
Rather than treating AI as a “one click app generator,” I approached it more like structured pair programming. I directed architecture, gameplay systems, feature planning, debugging, testing, iteration, and project organization, while AI accelerated implementation and repetitive development tasks.
One of the biggest lessons I learned was that workflow design matters just as much as prompting.
Phase-Based Development
Before writing production code, I used AI to help generate a full phase-based development outline for the game.
Each phase had:
a clearly defined goal
implementation scope
testing criteria
isolated Git branches
completion checkpoints
The workflow looked something like this:
Plan a phase
Scope prompts tightly
Let AI implement the feature
Review and test manually
Refine edge cases
Merge the branch
Move to the next phase
This created a surprisingly clean development history with structured progression and meaningful commit messages.
No production code was generated until the overall structure of the game had been planned first.
What Actually Worked
Model Switching (Claude ↔ Codex)
I frequently switched between Claude and Codex depending on context limits, reasoning quality, or implementation drift.
This ended up having several unexpected advantages:
reduced long-context degradation
lower overall cost
forced re-grounding between phases
improved planning discipline
Different models also had different strengths depending on the task.
Human Validation Loops
AI would implement a feature and then stop, often providing testing instructions or validation steps.
I reviewed, tested, and refined features continuously rather than allowing large unverified code changes to accumulate.
That tight feedback loop helped keep the project stable even as the scope grew.
Git Discipline
Each phase was isolated into its own Git branch before being merged back into the main project.
That structure made experimentation safer and kept development organized as the game evolved.
AI Beyond Coding
AI was used for more than gameplay implementation.
The workflow also included:
asset generation
image processing
sound integration
video generation
documentation generation
command-line automation
Tools like ImageMagick and ffmpeg were integrated into the workflow with AI assistance, alongside ChatGPT for image generation and other production tasks.
Me vs. Me + AI
Realistically, I probably would not have had the time to build a project of this size entirely on my own within a few months while balancing everything else.
What AI changed for me was not the need for engineering judgment—it changed the speed of execution.
The combination of:
real-world software engineering experience
mobile development background
architecture planning
debugging ability
product direction
and AI-assisted implementation
turned out to be extremely effective.
To me, the process felt less like “AI replacing programming” and more like advanced pair programming with a very fast collaborator.
Cross-Platform vs. Native Development
For years I leaned heavily into cross-platform development.
My background includes:
Xamarin
.NET MAUI
React Native
Adobe AIR
The biggest advantage was always efficiency: one codebase and one primary skill set for multiple platforms.
But AI-assisted development changes that equation somewhat.
Recently I’ve been focusing heavily on native apps in Swift and Kotlin while using AI-assisted workflows to accelerate implementation, experimentation, and iteration.
That has made native development significantly more appealing than it once was.
My AI Coding Journey
I started experimenting seriously with AI coding tools in 2025 using Codex and later Claude.
Since then, I’ve:
rebuilt my Xamarin-based iOS app TimesX in native Swift
integrated Apple Intelligence-powered content generation into TimesX
replaced the original Xamarin version on the App Store
created a native Android version in Kotlin optimized for Chromebooks
built supporting websites and tooling
developed Alien Barrage using Swift and SpriteKit
experimented with Apple TV and Mac OS native applications for personal use
In just a few months, I’ve been able to build and ship substantially more software than I could previously as a solo developer.
I’ll admit it: I’m hooked on AI-accelerated development.
Not because it removes the need for engineering—but because it amplifies what experienced developers can accomplish.
Final Thoughts
One thing this project reinforced for me is that AI is most powerful when paired with real development experience.
Architecture decisions, debugging, testing, workflow design, platform knowledge, and product direction still matter enormously.
AI simply compresses the distance between idea and execution.
For experienced developers willing to adapt, that combination feels less like a threat and more like a significant advantage.
FFmpeg is one of those tools everyone knows is powerful, but can be complicated to use. It can do almost anything with video, but the learning curve is steep, and the syntax is unforgiving. Even after years of using it, I still find myself searching for examples or reusing old commands.
Recently, I experimented with using Claude as a kind of “translator” between what I want to do in plain English and what FFmpeg actually needs. The result was surprisingly effective.
The Problem
I had a simple goal, at least conceptually:
Take a screen recording of my iOS app
Turn it into a square video for Instagram
Use a slow-moving 4K cloud video as a background
Speed up both videos
Center the app video with padding
Add a QR code in the bottom corner linking to the App Store
Output a single, Instagram-ready MP4
The Approach
Instead of building the FFmpeg command myself, I described the entire process in plain English to Claude and let it handle the mechanics:
Trim the background video to skip the black frames at the start
Resize it slightly larger than the app video to allow padding
Match its duration to the foreground video
Speed everything up 2×
Center the app video both vertically and horizontally
Overlay a QR code in the bottom-right corner with padding
Name the output file
What stood out immediately was that Claude didn’t just generate a command—it ran and verified the output. If multiple steps were needed, it handled them without me having to reason about intermediate files or filter chains.
The Result
Less than a minute later, I had exactly what I wanted:
A square video
Animated cloud background
App video perfectly centered
QR code placed cleanly with spacing
Ready to upload to Instagram
I previewed it in VLC, and everything matched the mental image I had when I wrote the prompt.
Why This Matters
I’ve tried doing this same task in traditional video editors like iMovie, and ironically, it was harder. Tools with visual timelines can struggle once you step outside their expected workflows.
What made this interesting wasn’t just that AI “saved time.” It removed friction from a task that usually discourages experimentation. I didn’t have to remember FFmpeg syntax or worry about getting one parameter wrong—I could focus entirely on the outcome.
This also wasn’t really “programming” in the traditional sense. It was intent-driven tooling: describing a result and letting the system figure out the steps.
Takeaway
If you already know what FFmpeg can do but avoid it because of complexity, pairing it with an AI assistant like Claude is a game changer. It lowers the barrier without limiting capability—and it encourages you to try things you might otherwise skip.
Hopefully this opens up a few ideas for how you might use AI tools in your own workflows, even outside of coding.
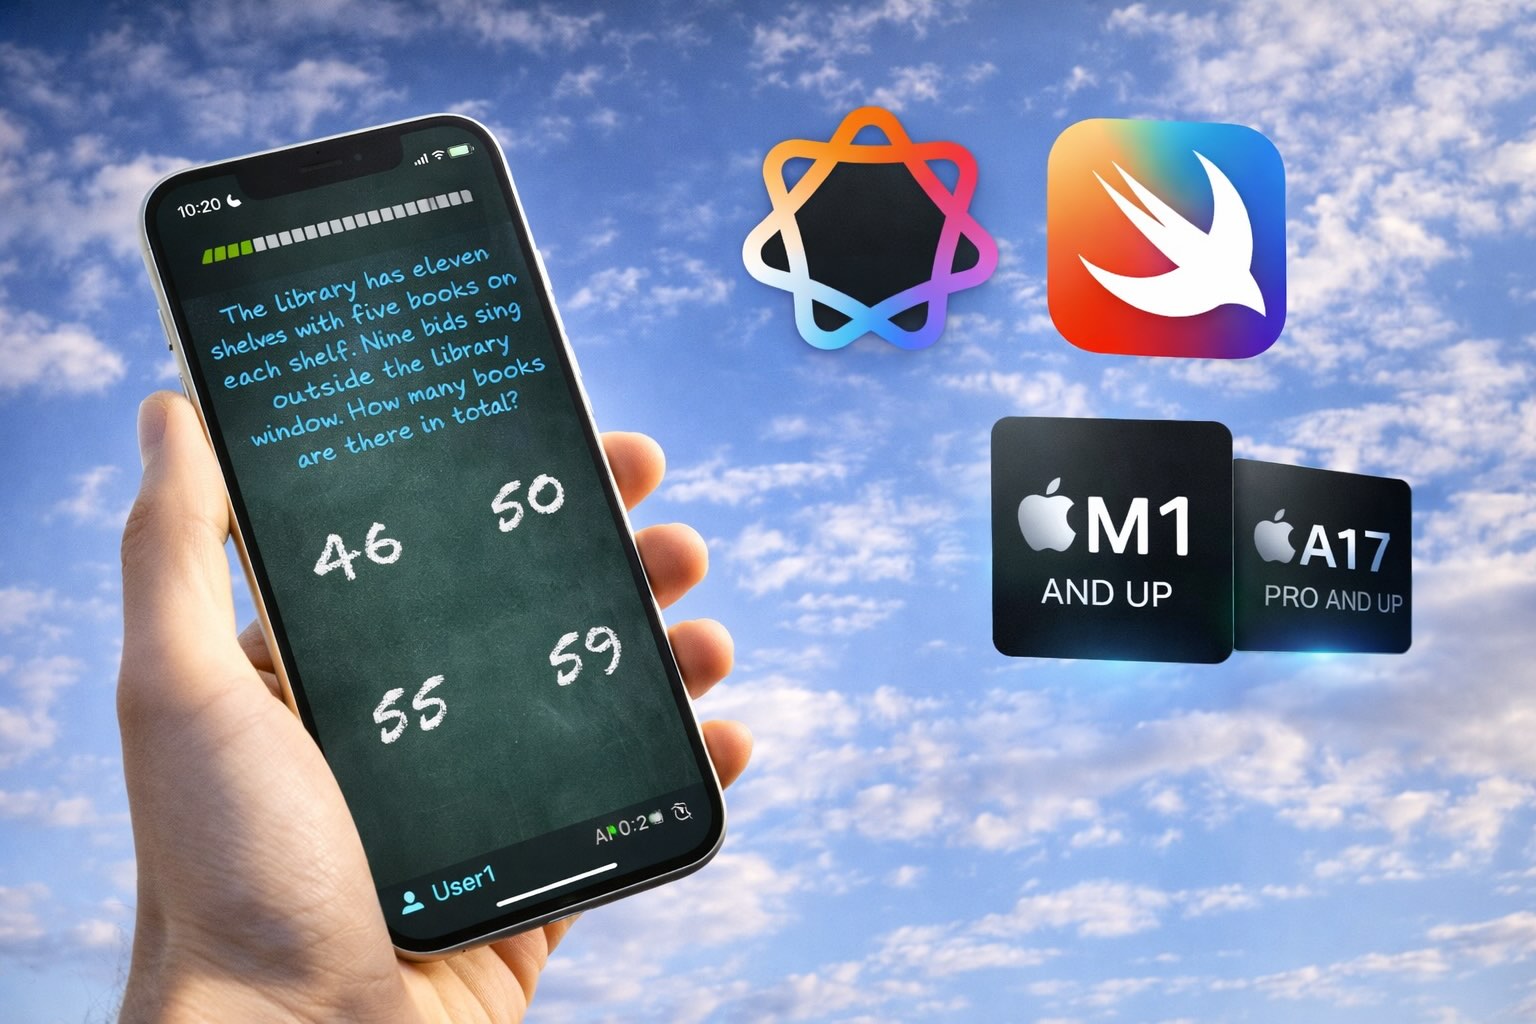
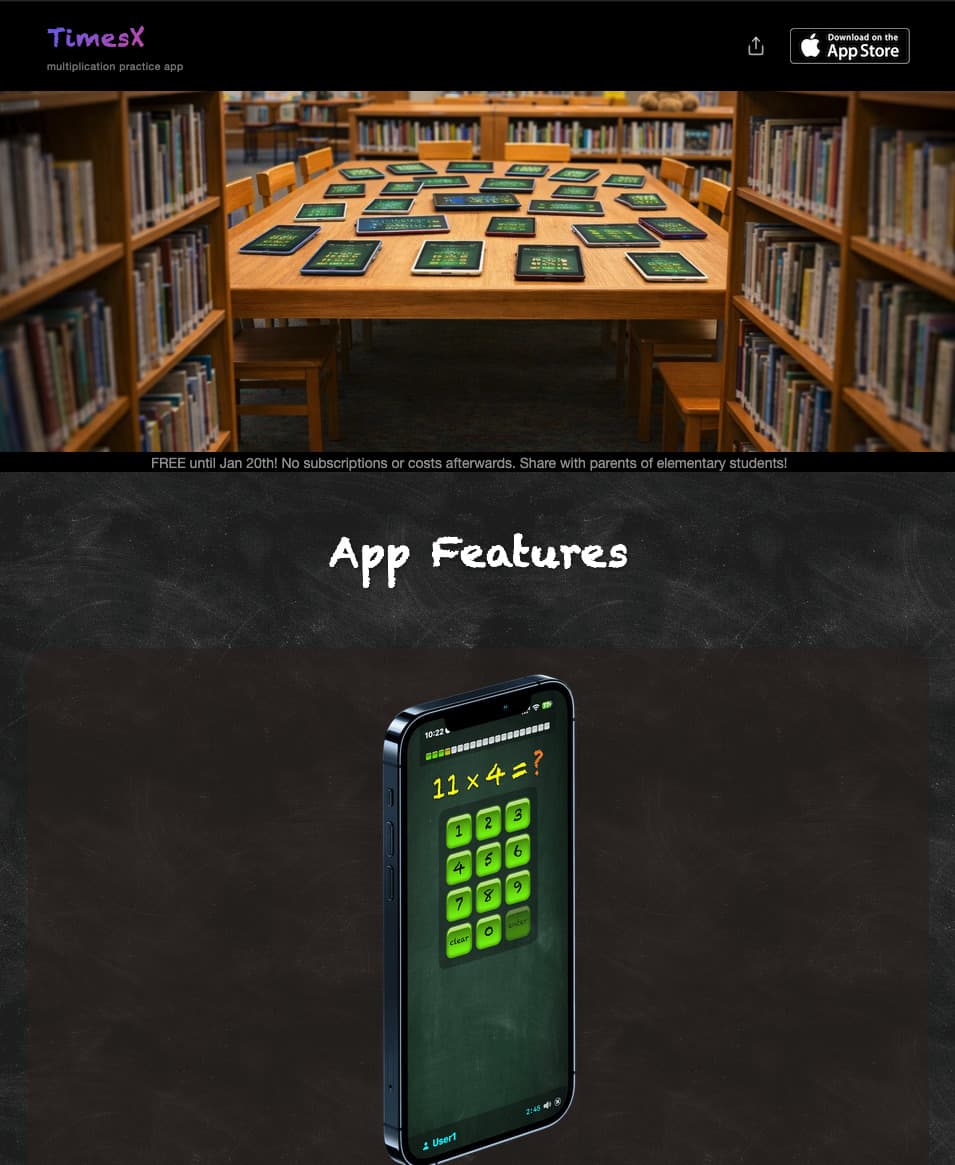
TimesX is the multiplication practice app that helps kids master their times tables — now with AI-generated word problems that run completely offline. See everything TimesX can do →
What’s New?
A decade after TimesX was first released, the 2026 version receives a full rewrite in native Swift, along with a major new feature: AI-generated word questions.
There is a clear industry trend toward empowering handheld devices with artificial intelligence, visible across personal computers, phones, and wearables such as Meta glasses. Apple began including NPUs (Neural Processing Units) in its chips starting with the M1 (Macs and iPads) and later the A17 Pro (iPhone 15 Pro). This enabled new AI capabilities on iOS devices—such as face detection and image classification—but also introduced support for an on-device Large Language Model (LLM ), similar in concept to ChatGPT.
How Does This Affect TimesX?
Since its creation, the app supported only two question types: Multiple Choice and Type the Answer. With the 2026 rewrite, a third question type—Word Questions—has been added.
This rewrite made it easier to access Apple’s on-device LLM directly in code. On supported hardware, TimesX can now generate fresh word questions for every quiz using Apple Intelligence. An important benefit for security-conscious parents is that the AI runs entirely on-device and does not require an internet connection. Once installed, TimesX can operate completely offline.
What About Devices Without Apple Intelligence?
For devices that do not support Apple Intelligence, TimesX includes a pre-generated bank of word questions. The AI feature can also be disabled in Settings, in which case the app will always use the question bank instead.
What Else Is New?
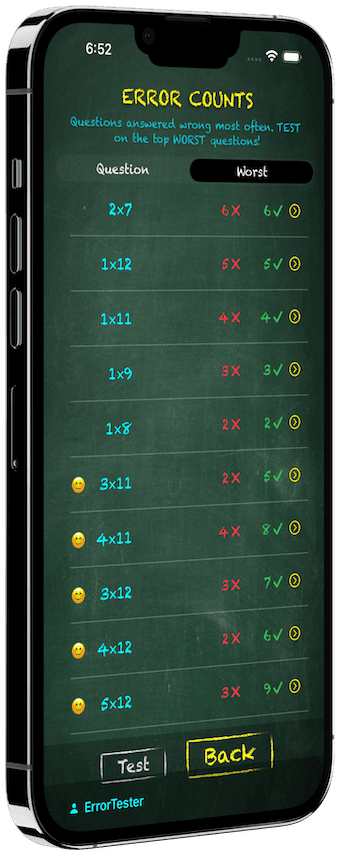
Dozens of refinements have been made across layout, imagery, and usability. Some of the most impactful improvements are on the Error Counts screen.
Imagine a child using TimesX to practice multiplication tables across dozens of short tests each day. The app tracks questions that have been answered incorrectly at least twice and surfaces them on this screen. The update adds visibility into how many times each question has also been answered correctly.
When a child starts a Test from the Error Counts screen, the quiz is built entirely from these problem areas. Over time, as accuracy improves, a happy face appears next to questions that have been answered correctly more often than incorrectly—clear feedback that focused practice is paying off.
Conclusion
If you—or someone you know—has a child in elementary school where multiplication tables are part of the curriculum, TimesX offers a more focused and adaptive practice experience than traditional methods or most existing apps.
The audio in this video contains several languages and subtitles were generated using the process described in this post.
I recently watched a movie on Netflix with scenes in multiple languages: English, Korean, French, and Italian. During the foreign language scenes, there was no translation, just the name of the language spoken, like “[Korean]”. How disappointing…
In a nerdy fit of revenge I decided to fix this myself. So, I obtained an .mp4 video file of the movie and went to work. The tech I’m about to describe uses AI to listen to your movie’s audio, translate it from almost any language, and create subtitles. You could also use these tools for other tasks such as generating lyrics for music.
The tools involved are a combination of ffmpeg and mlx-whisper – a version of OpenAI’s Whisper model optimized to take advantage of Apple Silicon chips. The hour and a half movie I mentioned took less than 5 minutes to generate subtitles on my Apple M2 Max Macbook Pro with 32Gb of memory. I asked ChatGPT what makes mlx-whisper faster on Apple Silicon chips and this is what it said:
Unified Memory Architecture (UMA): Apple Silicon chips use a unified memory architecture, allowing the CPU, GPU, and Neural Engine to access the same memory pool. This reduces latency and improves data transfer speeds, which are crucial for machine learning tasks.
Metal Performance Shaders (MPS): MLX leverages Metal Performance Shaders, Apple’s framework optimized for machine learning on Apple Silicon. This ensures efficient execution of operations compared to traditional frameworks like PyTorch with MPS backend.
Specialized Machine Learning Accelerators: The Apple Silicon chips include dedicated machine learning accelerators that provide hardware-level support for common algorithms and models, significantly boosting performance for tasks like transcription in Whisper.
Batched Decoding: Implementations like Lightning Whisper MLX utilize features like batched decoding, which improves throughput by processing multiple inputs simultaneously.
Neural Engine: The Neural Engine on Apple Silicon is designed for AI tasks, offering high-speed performance for operations related to speech recognition and transcription.
Optimized Operations: MLX uses custom-implemented operations that are optimized for Apple Silicon, outperforming traditional CUDA and other GPU-based setups in some benchmarks.
What you’ll need
A modern Mac using Apple Silicon
The Terminal app
This is how you get ffmpeg and mlx-whisper on your Mac.
Follow the resulting instructions displayed in the terminal to make brew into a command. These were mine, specific to my user name on the machine. Copy yours from the terminal
Download the script from https://bootstrap.pypa.io/get-pip.py into a folder you can run the terminal from. You can also right-click the link and save it
python3 get-pip.py
Give it a quick test by typing pip and hit return
MLX-Whisper
pip install mlx-whisper
Give it a quick test by typing mlx_whisper and hit return
You can open the .srt file with a text editor and take a look, as well as make manual edits if desired. Now, you can either overlay the subtitle into the video, or add it as a track, so you could turn it on/off when viewing the video.
Now, suppose you wanted to do this to a folder of .mp4 files. You could loop through them with a shell script. I created this one and it worked for me:
#!/bin/bash

# Loop through all .mp4, .mkv, and .m4v files in the current directory
for video in *.mp4 *.mkv *.m4v; do
  # Skip if no matching files are found
  [[ -e "$video" ]] || continue

  # Extract the file extension and base name
  ext="${video##*.}"
  base="${video%.*}"
  subtitle="${base}.srt"

  echo "Subtitling: $video"
  mlx_whisper "$video" --task translate --model whisper-large-v3-mlx --output-format srt --verbose False --condition-on-previous-text False
  sleep 3

  # Check if the matching .srt file exists
  if [[ -f "$subtitle" ]]; then
    output="${base}_subtitled.${ext}"
    echo "Creating video: $output"
    echo " from subtitle: $subtitle"
    ffmpeg -i "$video" -i "$subtitle" -c copy -c:s mov_text "$output"
  else
    echo "Subtitle not found for $video"
  fi
done
Because my media player can play .mp4, .mkv, and .m4v files, and they all work with these commands, I also added those formats into the loop.